Categories
Student Life

Revamp Recollections: Making over The Concordian office

Sit the f*ck down, Property Brothers, there’s a new pair of renovators in town.

For reasons I will never fully understand, Mackenzie Lad, digital editor and production manager here at The Concordian, and I, were given permission to makeover the office. Equipped with limited knowledge and a whole lotta drive, we spent the entire reading week completing step one of this process: revamping The Concordian’s meeting room.

By the looks of it, the meeting room hadn’t been fixed up since the late 70s. The furniture alone was a dead giveaway: all burnt orange and lime green material, the chairs were so coated in dust and mysterious stains that I’m pretty sure they qualified as archeological artifacts. A series of old, rickety desks and tables were pushed into the corners of the room, their only purpose to serve as landing strips for generations of Concordian staff and their random junk: uncapped pens, broken computer keyboards, empty coffee cups, loose papers. Some of these documents dated as far back as 1979, and if that doesn’t signify the need for an update, I don’t know what does. Clearly, we had our work cut out for us.

Step One: Paint the Damn Walls

On our first day, we were graciously joined by Matthew Coyte, our managing editor, and our good pal Sean Hennegan, who doesn’t work for The Concordian but was helping us out as an act of charity.* Since Mackenzie and I are not exactly Amazons, we decided to use Matt and Sean’s height to our advantage and tackle the walls first. The plan? To revamp the navy walls with a shade of sky blue and to add a fresh coat of white paint everywhere else.

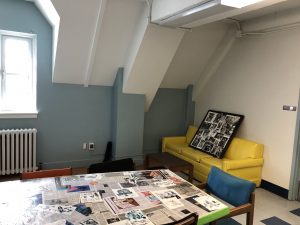
I was young and naive then (last week), so I figured that by the end of the first day, each wall would be covered in its first coat of paint. In retrospect, this was an absolute pipe dreampainting is a painstakingly tedious endeavour. Between covering the door frames with tape, filling the holes with spackle and laying the actual paint down, we put in hours and hours of work, only wrapping up at the end of day three. That said, it’s remarkable what a new coat of paint can do, leaving a room that once felt dark and drab now light, airy and open. It was worth it!

Step Two: Fix Up the Furnishings

After the painting was finished, we decided it was time to deal with the meeting room’s abundance of ancient furniture. We started by getting rid of a few things: a desk with a broken leg, a table that didn’t quite fit with the rest. Some of the remaining furniture needed a bit of TLC, so we wiped down the chairs, painted a couple of the shelving units white and stained one of the tables deep mahogany brown to match the others.

We also rearranged the layout of the room, repositioning desks and moving chairs around, and it was with this step that I saw our transformation really start to come to life. “We’re in the home stretch!” I kept repeating, like some dad at a barbeque whose burgers were nearly ready to come off the grill. Ever-so-cordial, Mackenzie endured this embarrassing aspect of my personality like an absolute champ, pitching in with enthusiastic “yeahs!” and “woo-hoos!” as much as she could bear. It was true, though: all that was left to do was the fun part.

Step Three: Sweet, Sweet Memories 

Like any media publication, The Concordian has accumulated a significant amount of archival material over the years. Decades-old, black-and-white photographs of various Stingers sporting events were scattered on the tabletops, put there who-knows-how-long-ago with the intention of hanging them on the walls. Newspaper after newspaper, many of them yellowed with age, were piled up on the shelves, and negatives of issues-past were stacked in boxes in the corner.

Sifting through the archives was like taking a trip back in time and we wanted to incorporate the material into our decor as much as we could. We framed and hung some of the Stingers photos, finally giving them their rightful place on the wall, and tacked the rest to a huge corkboard above the couch.

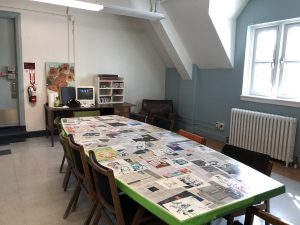
We also thought it might be cool to cover the main meeting room table in a collage of old publications, so we spent one afternoon breathing in Modge Podge fumes as we cut and pasted pieces of newspaper to the wood. I think it was a success!

There are two more rooms at The Concordian that we haven’t touched yet—the production office, where we design the layout of our paper each week, and the studio—so Mackenzie and I still have a ways to go. Up next, we plan to tackle those Cheez-Whiz coloured walls. I’ll keep you posted.


*Editor’s note: Sean has kindly asked that we refer to him by his chosen title of “Senior Executive Intern.” Since that position does not actually exist at this publication, we will henceforth be referring to him by his second title of choice, “Local Cool Guy.” 


Collage by Mackenzie Lad ft. the real Property Brothers

Categories
Student Life

DIY diaries: Apartment decor

You know how taking hormonal birth control tricks your body into thinking it’s pregnant? Well, I think mine has tricked me into thinking I’m a mother of three, armed with a Pinterest account, the loyal patrons of my mommy blog and a burning desire to get crafty. (My children’s names in this scenario are Kayleeigh, Kaiylen, and Kaedenn, by the way).

Let me explain.

I’ve recently noticed a monumental shift in how I like to spend my free time. Lately, my perfect evening is spent holed up in my apartment, pounding Diet Cokes and making macrame. Nothing gets me more jazzed these days than the prospect of organizing my cupboards or repainting my closet doors. Who have I become?

As winter slowly draws to a close, the mood to change things up in my home has been especially strong. Redecorating costs can add up quickly though, so I’ve had to find some ways to do it on the cheap. Here are some easy, quick, and affordable projects that I’ve really enjoyed so far.

A great way to make things a bit more sophisticated is with a quick coat of paint. Photo by Laurence Brisson Dubreuil

Plants, Paints and Pots

Whenever I pick up a new houseplant for my home, I usually plant it in one of those cheap terracotta pots from the dollar store. While this looks nice enough on it’s own, a great way to make things a bit more sophisticated is with a quick coat of paint. Personally, I’ve been enjoying this stone-gray colour. It’s easy to paint over afterwards and the porous surface of the terracotta is really forgiving when it comes to making cheap paint stick on. The only thing left to do is actually remember to water the plants. This is something I struggle with and will likely continue to struggle with until the end of time.

Any kind of paper works when it comes to origami. Photo by Laurence Brisson Dubreuil

Origami on a String

I recently took up the hobby of making origami—again, I genuinely don’t know who I am anymore. Something I’ve been doing lately is stringing paper cranes together using a needle and embroidery thread, and then hanging them around my apartment.  I think it adds a really pretty pop of colour to the room and the cranes are surprisingly easy to make once you get the hang of the different folds. I learned how to make them following YouTube tutorials.

As long as it’s cut in a square shape, any kind of paper works when it comes to origami. That being said, I do find that using actual origami paper makes things much easier since it’s so thin and easy to fold.

Chalk paint is great because you can apply it to all kinds of surfaces. Photo by Laurence Brisson Dubreuil

Put Some Chalk Paint on It 

Do you have a roommate? Does that roommate have an old whiteboard they’re going to throw out? Does that same roommate also have a can of spray-on chalk paint? Do you feel confident enough in your relationship with said roommate that you can steal their whiteboard and chalk paint without their permission? If so, try it out!

A chalkboard looks much nicer than a whiteboard, in my humble opinion. Plus, chalk paint is great because you can apply it to all kinds of surfaces. Just make sure to draw a cute doodle of you and your roommate on it afterwards, to make up for stealing her things.

Cards are Cute

A cheap frame from the dollar store is a magical thing. I keep a stack of them stowed away in my closet, so that whenever I stumble across a cute print, I can easily hang it up that same day. A frame also allows you to get creative with what you display on your wall because it makes almost everything look pretty, elegant and intentional.

A frame allows you to get creative with what you display on your wall. Photo by Laurence Brisson Dubreuil

Lately, I’ve been really into framing the postcards I’ve collected over the years. Whether they be from my own travels or someone else’s, I can’t resist bold colours with a glossy finish, ya know? I think they look lovely grouped together in four-panel frames like the one you see here. (The skull print is not a postcard, by the way, but a print by a local artist—you can find her as manson.grrrl on Instagram. Her stuff is great!).

This also works really well with greeting cards. In this case, I cut off the front portion of the card and glued it down on a coloured piece of paper so that it would fit into a larger frame. It’s a great way to liven up a room without spending the big bucks.

Redecorating doesn’t have to be expensive and time consuming, and you don’t even have to be a Pinterest mom to make it happen. Plus, focusing your energy on personalizing your space and working on yourself is a great way to put off studying, so that’s healthy! Hopefully these ideas can inspire you to get creative with your home. Happy decorating!

Photos by Laurence Brisson Dubreuil

Categories
Arts

Happening in and around the White Cube this week: Paper art and sustainable making solutions

Paper has always been something fascinating to me. Delicate and natural, this material is often overlooked as mundane and common.

A problem I have with art-making lies in its material. I love to make, I love painting, drawing… I hate making waste. When I began to teach, I stopped painting. I hate having to throw away dried up paint tubes almost as much as I hate watching people squeeze too much paint on their disposable palettes.

Last year, while I was interning at Concordia University’s Centre for Creative Reuse (CUCCR), I was taught to make paper, and led several workshops throughout the year. I was hooked. I am hooked. I ripped up old anthropology readings to make a test sheet. The acting of ripping, blending, and pulling the wet pulp was so liberating that I didn’t stop until I had collaged a rather large pulp sheet on multiple smaller sheets of felt. The uneven patched felt foundation allowed for ridges and bumps in the paper. Once it dried, it was as stiff as a board.

Since then, I’ve made several sheets of paper with all kinds of old drawings. I plan to make a series with old issues of The Concordian at some point.

So it goes without saying, when I got word of Mylene Boisvert’s “Spinning Paper Thread” workshop at the Visual Arts Centre, I was ecstatic. The workshop was part of her exhibition at the McClure Gallery, a collection of delicately woven and crocheted paperworks. Lace-like, they clung to the gallery’s walls, blowing ever so slightly anytime a door opened.

Some looked like netting and shedded reptilian skin. Others swirled so tightly and intricately, it was hard to believe Boisvert used paper to make them.

In the workshop, we learned the artist’s spinning tricks and affinity for Japanese paper, which is thin and tough, made with plant fibers, both by hand and industrially. I was brought into a world of new possibilities. A place where I could continue to make without worrying about the material I would be leaving behind.

I believe that at the time we are living in, facing the climate crisis, art-making practices cannot be excused. No one is above it; no politician, no economist, no student, no teacher, and especially no artist.

If you are interested in papermaking and spinning paper threads, I recommend attending a workshop at Atelier Retailles. Mylene Boisvert will be leading a spinning workshop on Oct. 10, following the beginner papermaking skillshare on Oct 5.  


Categories
Student Life

Exploring underground vintage pop-up shops

Founding member of Psychic City offers a wide range of vintage clothing at affordable prices

In the basement of a building in the Plateau Mont Royal, down a staircase lined with handwritten signs and graffiti on the walls, once a month you’ll find the vintage pop-up shop Good Vibes.

The home for this underground fashion haven is Psychic City, a multidisciplinary arts venue that hosts music, fashion, comedy and film events. One of the venue’s founding members, Paulina Pietruczuk, previously studied fashion design


“Fashion has always been a passion of mine, especially thrifting, recycling clothing and being green,” she said. When her friend suggested she arrange a vintage pop-up shop, Pietruczuk went for it. The most recent shop was open on Sept. 21 from 1 p.m. to 8 p.m. Psychic City will also be playing host to screenings of Hocus Pocus for Halloween and concerts, to name a few of its upcoming events.

The rented space has a cozy, ambient vibe. It’s lit by yellow and colourful fairy lights that nicely complemented the art on the walls. According to Pietruczuk, the space has been home to artistic events for many years. Before becoming an arts venue, the space was used primarily as a practice space for many local bands. However, its purpose recently shifted to emphasize providing a safe place for artists to be creative, whether it’s playing music, sculpting or painting.

Vintage jeans for only $3 a pair. Photo by Sandra Hercegova

On the day that Good Vibes opened its doors, clothing racks filled with different styles, fabrics and textures lined the room. Garments ranged from furry and oversized to tight and silky. Old, wooden chairs surrounded the clothing racks with a black leather couch placed right in the middle. Vintage denim pieces were neatly laid out on a table. A few recognizable brands, like Adidas, Beyonce’s Ivy Park and even a Toronto Raptors jersey, could be spotted in perfect condition, on sale.

One shopper, Hannah Clifford, changed into the pink culotte pants she found at the pop-up as soon as she bought them. She said she has been invested in thrifting for the past eight years because it’s cheaper than shopping at mainstream retailers. She added that she always finds quality second-hand clothing at these types of shops. “The special thing about thrifting personal collections that are on sale is that you get to see a memoir of [the seller’s] mood and their style,” Clifford said.

Clothes weren’t the only items available either. Spread out over one table was an array of handcrafted jewellry by Montreal-based Rufina Ip. Everything from bracelets to chokers to necklaces could be found in a variety of colours, ranging from pinks and oranges to black and blues.

A burgundy velvet quilted bomber jacket with embroidery styled by Alexa Rhynd. Photo by Sandra Hercegova

Anyone is welcome to sell their clothing at Good Vibes, according to Pietruczuk. This is why Montrealer Alexa Rhynd was able add some of her clothing to the collection just a few days before the shop opened. She said the clothing she brought were items she was ready to let go of and pass on to a new owner.

Rhynd also included a few pieces she had spiced up herself, such as a burgundy velvet quilted bomber jacket. The garment’s deep red is now complemented by a wall embroidery piece sewn on the back which features a beautiful design bordered with gold. She was also selling a pair of painted jeans. “This is the very beginning,” Rhynd said about her attempts at enhancing clothing. “I don’t know what I’m doing yet, but I’ve already changed a lot.”

Thrifting and buying second-hand clothing can be a great way to recycle your wardrobe and be more green, Pietruczuk added. “Why not do it while enjoying music in a creative space,” she said.

For more information about Psychic City and a list of its upcoming events, visit the venue’s Facebook page.

Categories
Student Life

Food isn’t always good for the skin

Lemon juice treatments, baking soda masks, sugar scrubs—type “DIY acne treatment” into Google, and you are likely to find a slew of articles that praise these treatments and other common household items for their alleged pimple-fighting benefits.

But are these trending DIY ingredients truly effective in treating pesky skin ailments? The kind of skin-care advice found in many women’s magazines, as well as in online beauty and health articles, may actually be ruining your skin.

Let’s begin with the widely-acclaimed beauty blog miracle ingredient: lemon. A health.com article titled “15 Home Remedies to Make a Pimple Vanish,” advises readers to “wipe lemon juice across your pimples with a cotton ball, and leave it on overnight.”

This common skin care treatment overlooks an important aspect of our skin’s chemical makeup: its acid mantle. The acid mantle is the skin’s barrier to bacteria, viruses and other potential contaminants—it is measured by pH.  Through their research for Wake Forest University’s department of dermatology in North Carolina, Dr. Saba Ali and Dr. Gil Yosipovitch stressed the importance of the skin’s acid mantle.

Ali and Yosipovitch expressed in their research paper some concern over the disregard to acid mantle.  They argued that skin’s acid mantle is vital, and that “recognizing factors that alter skin pH and selecting products that preserve the acid mantle is of prime importance” in treating skin.

Exogenous factors, like products that are too acidic (low pH) or too alkaline (high pH), cause damage to the skin’s barrier and lead to “compromised skin,” according to a research paper by American dermatologist, James Del Rosso.

Lemon juice has a pH level of two, while human skin is roughly 5.5. Therefore, Del Rosso explained, this difference in pH levels means using lemon juice on your face can lead to loss of skin elasticity, increased skin rigidity and acne.

According to a 2014 research paper by endocrinologist Dr. Stacey E Anderson and dermatologist Dr. Barbara Jean Meade, having compromised skin can make you more at risk to toxic chemicals that irritate and further damage the skin.  This is because, if the skin’s pH is compromised, chemicals can get through the outer layer of the skin, and inside the body.

Another popular ingredient seen in amateur skin care articles is baking soda. According to Doctor Oz’s website, “you don’t need harsh chemicals to fight acne. Try a mixture of baking soda and honey to help clear skin.”

Baking soda is an alkaline, with a pH of nine. Whether alkaline or acidic, Anderson and Meade’s research found that the pH of daily skin care products is very important to protect the skin barrier.  Baking soda’s pH is, therefore, just too high for skin to handle.

However, some household items are proven to be good remedies.  The aforementioned skin-clearing mixture of honey and baking soda, while best to be avoided, includes honey. In a research publication for the Iranian Journal of Basic Medical Sciences, dermatologists Tahereh Eteraf-Oskouei and Moslem Najafi explored honey’s benefits.  They argued that topical application of honey has healing effects for superficial skin burns and operation wounds, making honey a safe ingredient in DIY skin care treatments.  Honey’s average pH is 3.9, but can range anywhere from 3.4 to 6.1.

While some websites may provide acne-sufferers faulty skin care advice, online communities exist to counteract the wave of careless information. Forums on Reddit, for example, pride themselves on circulating facts about skin care discovered in scientific journals.

Graphic by Thom Bell

Categories
Music

Intro to mixing: perfecting home studio sound

Mixing is an essential to adjusting reverb, equalization, compression, and other sound levels

Nowadays it seems like anyone can record music professionally at home. While it’s true that software and basic equipment is readily available for any amateur musician to get their songs recorded, there are usually noticeable differences between a studio-recorded track and a home recording. That’s no reason to get discouraged, though, as there are several mixing tips that can make your recordings sound as good as they can, given the software you have at hand.

First things first: you need a recording with crisp, clear sound to work with. In really basic terms, this usually means a recorded vocal track and an instrument track. The worst thing a musician can do is work with bad sound to start and think it can be “fixed” by layering dozens of effects. Starting with good sound will maximize what your effects will add to the track (less is more!). Make sure you have good over-the-ear headphones, but you should switch between listening through speakers and headphones at low and medium volumes while editing.

Mixing varies for every recording, depending on genre, instruments used and sound of voice. Regardless, there are a few basic elements that I think will work well with any type of recording to help it get that ‘studio’ feel; it’s just a game of trial and error.  Most of the effects I will mention are a simple drag-and-drop into your tracks. In every program their locations will be slightly different.

When it comes to mixing, reverb on vocals immediately comes to mind. While reverb can make vocals sound echo-y and smooth (the echo can rid of minor vocal flaws), it’s important not to go overboard with it. Too much reverb can cause the sound to appear hollow and fade into the background. So unless you’re working on a ghastly horror movie track, it’s best that reverb slightly enhances but doesn’t overpower. Mess around with reverb levels and filters, but make sure to play back your changes. You can mute all other tracks except vocals to isolate them, but play it back with all the tracks once you think you’ve got it right to insure it’s at the right level, because at the end of the day, mixing is about all the tracks working together, and subtle changes can throw other elements of the recording off.

Lana Del Rey has a secret to her airy vocals: layering. This technique makes for a fuller, more perfected sound. The key is to duplicate your original vocal track, but instead of keeping it at full volume, decrease it by about half (roughly -6dB), to where it can be heard but not seem noticeably doubled. To create that extra-layered effect, instead of using a reverb filter, try a delay filter on this track.

        Equalization and compression can make a huge difference in levelling sound. Equalizers affect the level balances across the frequency spectrum of your sound. They can help solve acoustic problems in non-studio rooms (perfect for those in working in a home-studio space) and cut unwanted low frequencies that aren’t the actual instrument recorded, like ambient noises picked up during recording.

Compression, on the other hand, affects the level balances across time.  The human voice does not project in a completely even level, and a compressor will bring down the highest peaks that are above the threshold level, restoring the level throughout the recording. This makes for an even, controlled vocal. Compression is by no means auto-tuning; it’s more fine-tuning audio levels.  Many equalizer and compression effects are pre-made so you can just drop them into your tracks, but don’t be afraid to toy around with the settings to get the filter to suit your sound.

After working on a song let it be and come back to it the following day. A fresh mind will help bring unnoticed sound issues to the surface. It’s also good to compare your work to other similar pieces of music; this will help you envision your desired sound. Remember, there is no mixing formula; it’s all about being open to it all!


Categories
Student Life

Make do and mend: falling in love with the DIY trend

In a society dominated by a desire for immediacy and a reliance on ready-made products, it is surprising that large groups of men and women are taking the time to adopt a resourceful and creative lifestyle through DIY, (“Do it yourself”), projects.

Photo by Mara Richardson

What was once considered by cool kids to be a thrifty, last-resort, or “poor” way of living has now resurfaced as an undeniable cache in the domains of fashion, art, and home decor.

Wikipedia defines DIY as “a method of building, modifying, or repairing something without the aid of experts or professionals,” the opposite of the “easy way out.” Successfully completing a project usually requires time and a well-stocked supply closet.

The term, put into common use in the 1950s, encompasses every possible medium: clothing, furniture, art, even cooking. For some modern DIYers, the passion transcended childhood, when machines like “The Bedazzler” made it easy to transform drab, run-of-the-mill department store clothing into unique, wearable pieces of art. Taking on these types of projects allows people to customize and personalize everyday items, and gives them the opportunity to add sentimental value to items that are worth nothing monetarily.

However, when most products are readily available in-store or online, the fundamental question is: why DIY? What is it about labour-intensive, old-timey arts and crafts projects that attract such a diverse crowd of people?

“It is the thrill of creating, experimenting and designing that I enjoy the most when I DIY,” said Mara Richardson, a specialty blogger at Wise Women Montreal and owner of Cherry on Top Designs, a company that makes custom decor items for children’s rooms.

“I think it is becoming so popular due to the fact a lot of people are on a budget,” explained Richardson. “So whether you find a treasure on the side of the road, recycle something you already own or buy something second-hand, you have the upper hand to creating something all your own.”

Photo by Mara Richardson

Creating DIY goods is a cost-effective way to decorate your home, a subtle way to reject consumerism and the mass consumption of everyday products. At any given time, there are items sitting in thrift shops, flea markets, or around the home that require a little TLC and will cost pennies to transform. It is a sustainable way of life, since items are essentially being recycled and repurposed instead of being thrown out.

Many DIYers appreciate the restorative and transformative value of their pieces. Aside from the strong sense of community and connection with other crafters, there is an undeniable allure in owning something that is unique. The positive mental effects of completing a project are what make it such a fulfilling hobby.It can allow any given person the opportunity to use both the hands and the brain, and deepens one’s appreciation for the things that we own, and the tools that allow us to transform them.

DIYers also adopt perhaps one of the most important qualities a person can have: the courage to screw up.

“It is both material and mental satisfaction owning something that you created from start to finish, a lot of times overcoming obstacles throughout that were unexpected, and surpassing them,” said Richardson.

Exit mobile version