– 4 packs of Jell-O or any other fruit gelatin brand (colours are up to you, for zombie I would use green, red, orange.)
– 2 packs of clear unflavoured gelatin
– 1 can eagle brand condensed milk
– A 9×13 inch pan (I use a clear casserole, as it goes in the fridge)
– 4 plastic contains, medium sized (for your Jell-o)
Instructions
1. Make your four packs of Jell-O, and when done, separate the colours into four containers. Let them chill in fridge.
2. Once the Jell-O is set, cut it up into medium sized cubes. Dump the cubes into your pan.
3. In a separate bowl, mix together two packets of clear unflavoured gelatin and half a cup of cold water.
4. In the same bowl, add in about 2 cups of hot water. Stir.
5. Once stirred, add your can of condensed milk and mix together. Let it cool in the fridge for a while. I usually leave it for about 30 minutes.
6. Once cooled, take your milk and gelatin mix and slowly pour it over the Jell-O cubes in your pan. Put the pan in the fridge and let it cool overnight.
In the morning, you’ll be able to cut your gelatin treat into cubes or any shape you want. You can even break it up unevenly and say it is zombie brains/guts! YUM!
“So you’re a Mennonite,” say people musingly when I reveal my identity.
This is the common reception I receive when I talk about being a Mennonite. Most people like to think of Mennonites as – farmers who broke off from the main Protestant branch to form their own group as anti-war personalities – hard-working, bulky people with a strong morality code and tantalizing cuisine.
Scratch that. The word “tantalizing” does not even cover 50 per cent of the scrumptiousness that Mennonite cuisine entails. I should know, having attended family gatherings that resemble the UN, where we miraculously rise from the dinner table and make it all the way, groaning, to the living room in one piece. Bread buns, pecan pies, beef stews, zucchini salads, chocolate cake, apple pie, roast pork, banana bread, grapefruit lemonade, pork pies… the list goes on and on.
Photo by Michael Eby.
Confession number one: I admire my grandmother. She managed to raise seven hulking children and bake at least two fresh pies every morning, milk the cows, bake some bread, and send the kids off to school on a horse-drawn carriage (it actually happened). My grandmother’s days were full to the brim. Yes, Mennonites can cook. Believe me.
So, in the honour of Mennonite cuisine, I hereby raise my hat to my favourite kind of cuisine. Confession number two: Mennonite food has nourished me through break-ups, unsuccessful interviews and the general angst that comes with life. My life would not be what it has been without Edna Louise Staebler’s Food That Really Schmecks.
One of my fondest memories growing up as a kid was living for a while in downtown Montreal, baking bran muffins with my father on crisp autumn mornings. He would show me his dog-eared recipe books with a couple of personal instructions or added ingredients written in clear, neat handwriting. I would be too small to reach the counter, so there are a number of pictures of me, a brown-haired little girl with pigtails, standing on a kitchen chair, folding dough with the seriousness of a police officer.
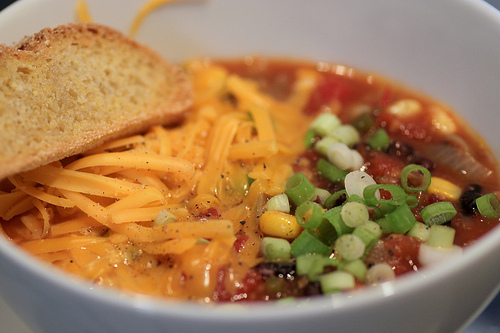
This autumn, when the weather begins to cool, hunker yourself down with this cabbage borscht Mennonite soup before you tackle some study notes. It will not disappoint, I guarantee you.
Flickr photo by Stacy Spensley.
You will need:
– 2 lbs of beef bones – 1/2 cup of cream
– 2 quarts of water – salt and pepper
– 12 carrots – parsley
– 6 potatoes
– 1 head of cabbage
– 1 ½ chopped tomato
– 3 onions
– 1/2 star anise
– 1 bay leaf
In a pot, heat up the bones and water over medium heat. Reduce the heat and let the liquid simmer for two hours. Once the broth is at the two quart level, drain the bones and put the broth in a new, clean pot.
Add the onions and let them simmer for half an hour. Add the potatoes, carrots, bay leaf, star anise and cabbage. Wait for 30 minutes, then add tomatoes and let them cook in for 15 minutes.
Have you had enough of this icy, cold Canadian weather? Well, it’s time to turn up the heat with a tropical twist on a classic Jamaican dish.
After spending my Christmas holidays in Jamaica, I learned three things: the Patois language is extremely addictive, the “no worries” attitude is incredibly infatuating and the craving for authentic jerk chicken is constant and everlasting.
I was daring enough to climb the Dunn’s River Falls and cliff dive from Rick’s Café but, upon my return, I was intimidated by this recipe and its elaborate list of spices. Finally, I decided it was time to tie up my hair, roll up my sleeves and prepare for a jammin’ time!
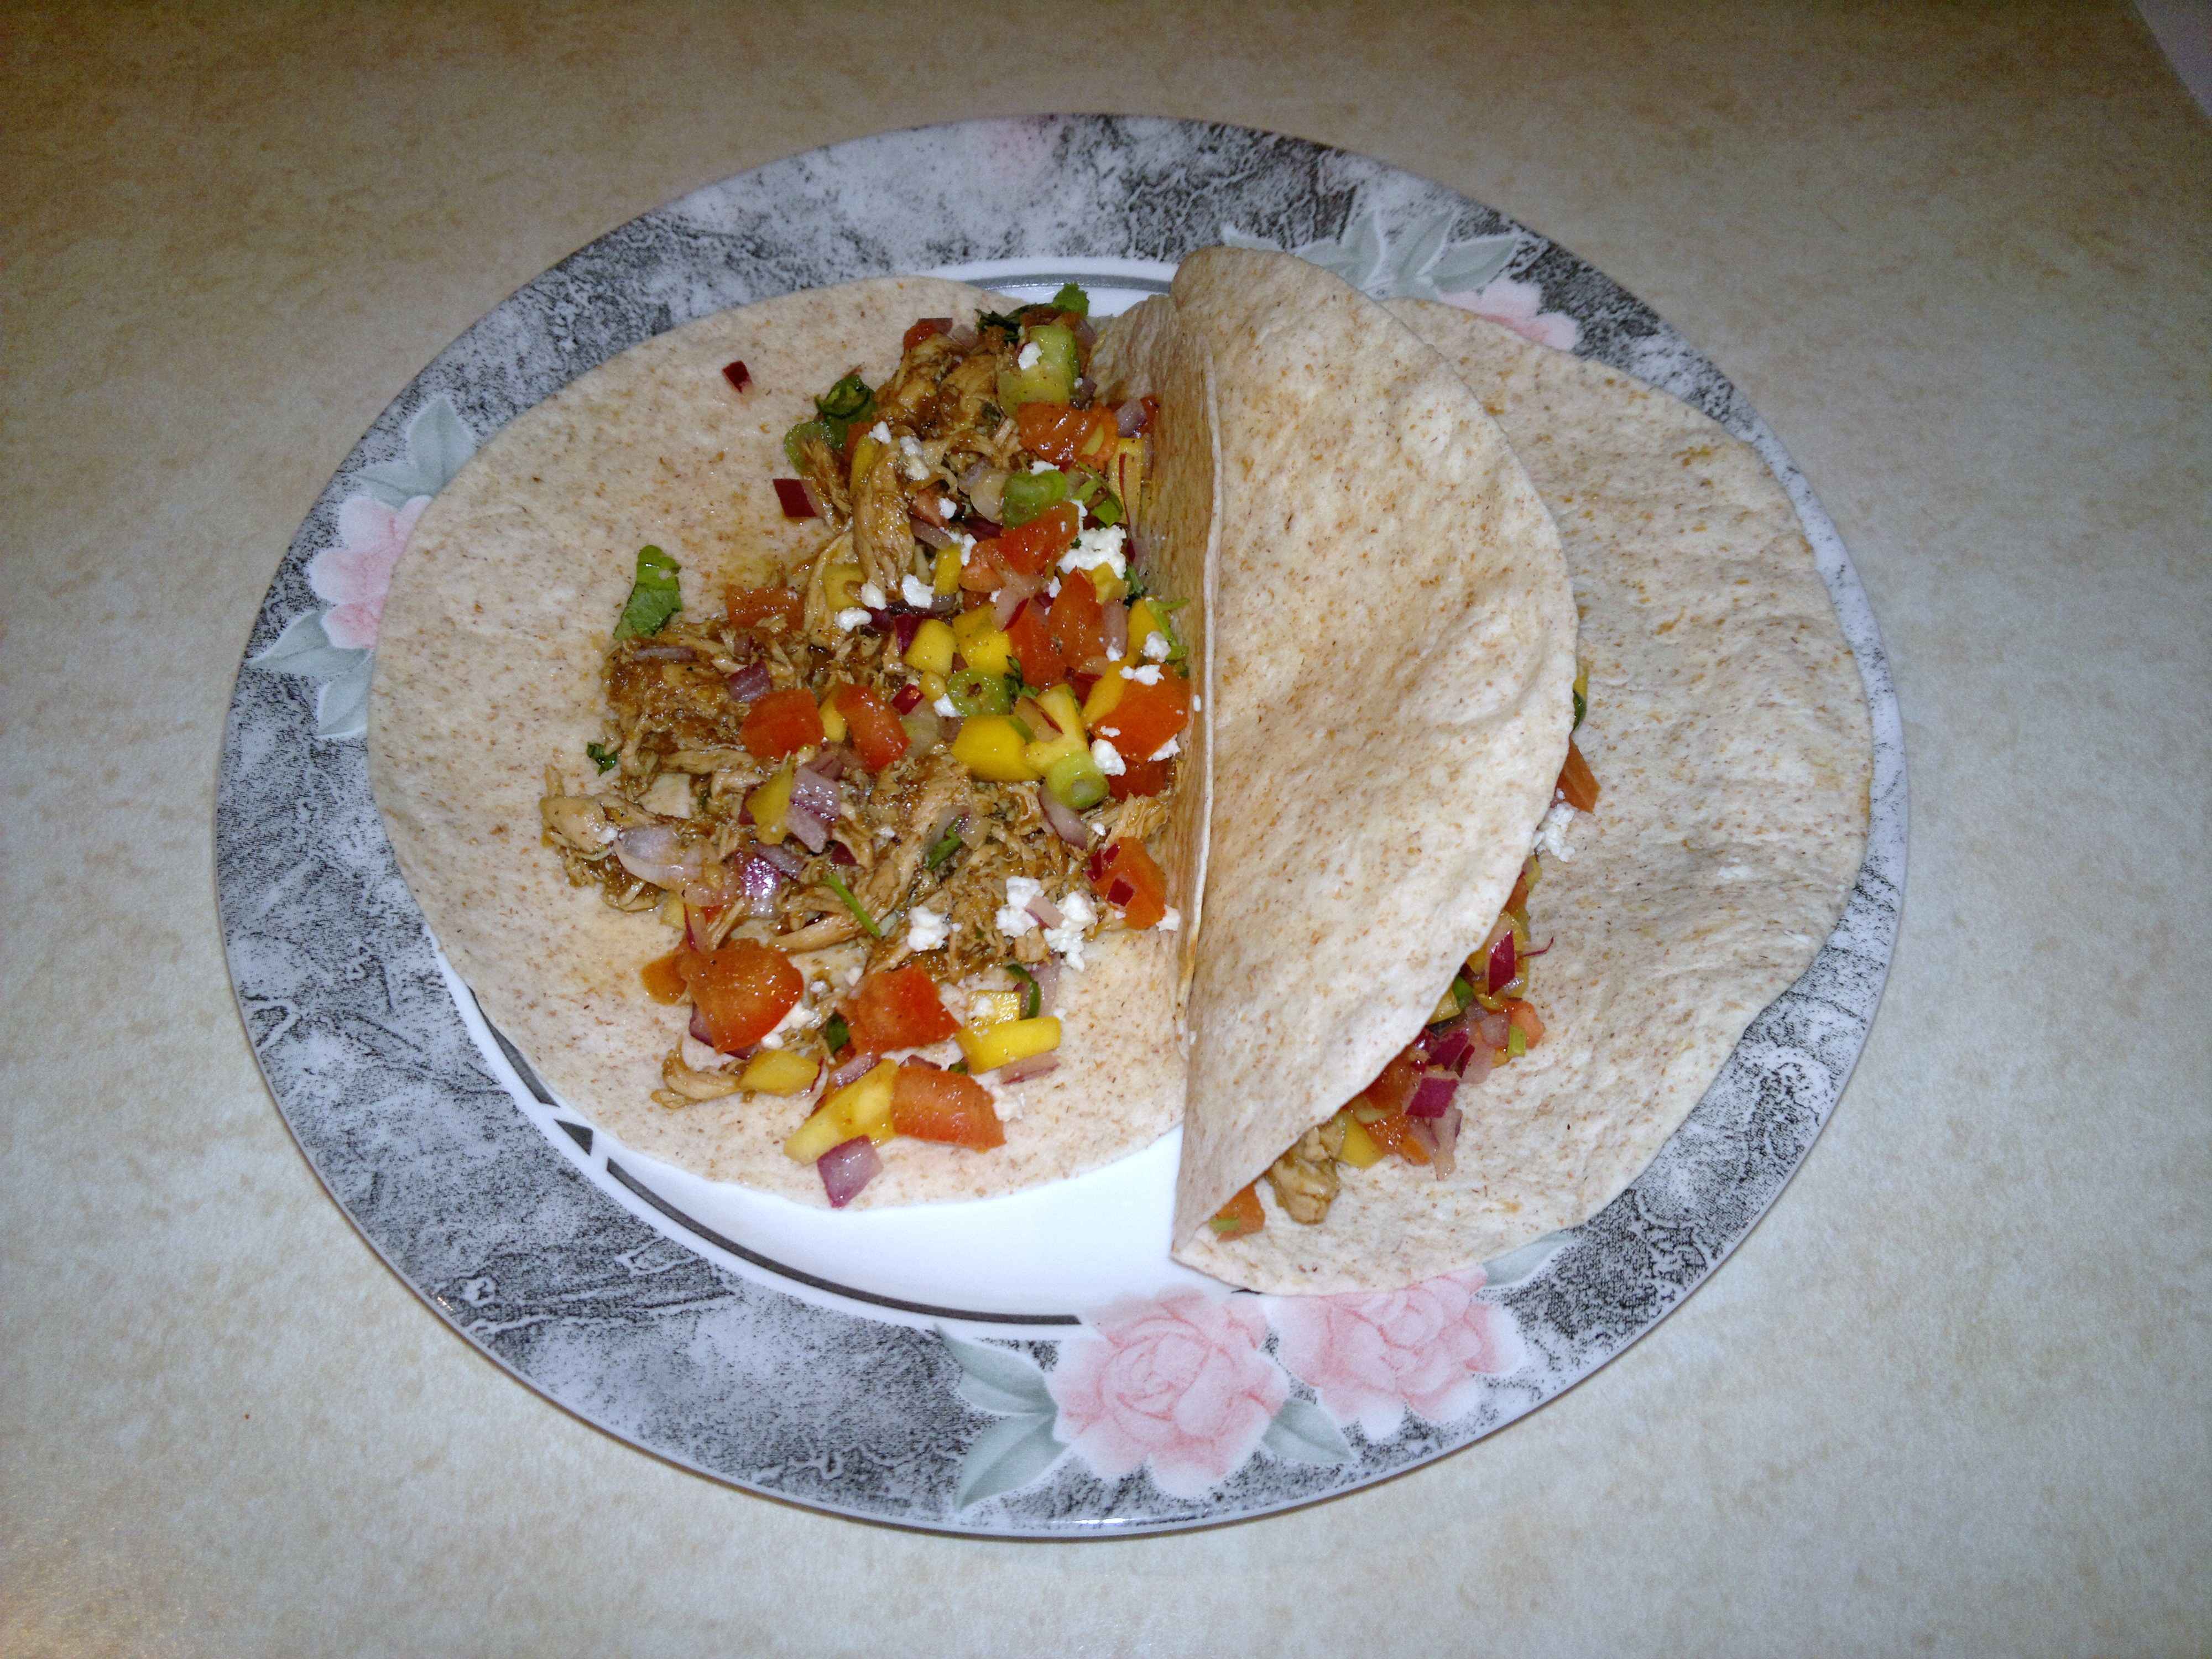
Once you have successfully marinated the chicken, feel free to be creative. You can eat a traditional jerk chicken meal by including side dishes such as rice and plankton or attempt this Caribbean inspired recipe for jerk chicken tacos.
Jerk Chicken Tacos. (Photo by Arohie Chopra)
(Serves four)
2 chicken breasts (skinless and boneless)
6 to 8 tortillas
Jerk Chicken Marinade:
2 yellow onions (chopped)
1 bunch of green onions (chopped)
2 garlic cloves (chopped)
1 cup orange juice
2 tbsp lime juice
2 chili peppers (chopped)
1 tbsp ground cayenne pepper
1 tbsp ground black pepper
1 tbsp ginger powder
¼ cup honey
¾ cup soy sauce
2 tbsp sugar
½ tsp sage
½ tsp nutmeg
½ tsp cinnamon
½ cup olive oil
½ cup white vinegar
Salt (to taste)
Mango Salsa:
1 red onion (diced)
1 tomato (diced)
1 green onion (diced)
1 mango (diced)
1 tbsp lemon juice
¼ cup cilantro
salt, pepper and ground cayenne pepper to taste
1. Place all the ingredients for the marinade into a blender and puree until smooth.
2. In a well-greased non-stick skillet, cook the chicken at medium heat for about 10 minutes, flipping once in between. Once it is golden brown on both sides, add ¼ cup of water and cover the skillet. Let the chicken simmer gently for another seven minutes.
3. Remove the chicken from the skillet and let it cool slightly. Using two forks shred the chicken.
4. In a large bowl add the shredded chicken and coat with the marinade. Once the chicken is thoroughly covered, place it in the fridge and let it marinate for at least two hours.
5. Mix all the ingredients for the mango salsa in a separate bowl.
6. When ready to serve, warm up the chicken and warm the tortillas. Garnish with the mango salsa.
Over the years I have had the privilege of travelling quite a bit. One of my most memorable trips was to China — climbing the Great Wall and visiting Victoria Peak were adventures I will never forget and neither will my taste buds. Since then I tried to recreate a dish I absolutely loved, Hong Kong style fish, and have been delighted by the result.
This nutritious recipe incorporates Hong Kong’s fusion culture with zesty flavours for the real food fanatic. The delicately steamed fish will melt in your mouth and leave you longing for more.
Hong Kong Style Fish (serves four) (Photo Arohie Chopra)
Hong Kong Style Fish (serves four)
1 bamboo steamer
4 fish fillets (sea bass, cod or haddock)
1 lb green beans
1 cup spinach
1 tsp sesame seeds
1/3 cup soy sauce
2 tsp sugar
1 two-inch piece of ginger (cut into thin strips)
2 green onions (chopped to your liking)
2 garlic cloves (peeled and crushed)
Line a bamboo steamer with the spinach and place the fish fillets on top. Place the bamboo steamer over boiling water and cover for eight to 10 minutes or until the fish flakes easily with a fork. Boil the green beans for five minutes in a pot. In a well-greased pan, stir-fry the ginger, green onions and garlic. Add the drained green beans and the sesame seeds. Continue to stir for five minutes. Mix the sugar into the soy sauce until completely dissolved and boil in a skillet. When plating the dish, drizzle the soy sauce mixture over all the ingredients. Serve with rice.
If you are single, Valentine’s Day is dedicated to indulging and splurging on sweets. If you are in a relationship, it’s the day to profess your unconditional love to your special someone in elaborate and extravagant ways. This year why not branch away from the usual roses, chocolates and anything red, and try a creative way to make your Valentine swoon.
This recipe for Lace Crêpes is the essence of romance. It can be served bright in the morning for breakfast in bed or in the evening with a dim candlelight dinner. Best of all it can be enjoyed by singles and couples alike.
Lace Crêpes (serves four)
Photo Arohie Chopra
Ingredients:
½ cup flour
1 egg
¾ cup milk
½ tbsp sugar
Pinch of salt
Maple syrup (for garnish)
Powdered sugar (for garnish)
Cinnamon Syrup (Makes 1 cup):
½ cup white sugar
½ cup packed brown sugar
2 tbsp flour
½ tsp ground cinnamon
1 tsp vanilla extract
1 cup water
1. Stir all the ingredients for the cinnamon syrup in a saucepan and bring to a boil.
2. Stir often until mixture thickens in consistency.
3. Remove from heat and let cool for 10 minutes.
4. For the lace crêpes, mix the flour, egg, milk, sugar and salt in a bowl. Whisk until the batter is smooth. 5. Pour the batter into a plastic squeeze bottle with a fine tip. Freehand a lace pattern on a non-stick pre-heated pan set on medium.
6. After about two minutes flip the crêpe to cook the other side. Once you have stacked 2-3 crêpes, garnish with cinnamon syrup and powdered sugar.
Twenty-something-year-old university students are known for being independent, motivated, and highly caffeinated. We strut as if the world twirls within our fingers. Yet, regardless of our tough exterior, we all miss the tastes of home sometimes. Since I come from a very food-oriented culture, it is inevitable that I turn to Indian cuisine for consolation when I miss my family. While it may be frosty outside, you can keep warm and mix it up by trying this sweet and spicy recipe for chilli paneer. Enjoy!
Chilli Paneer (serves four)
Ingredients:
1 tomato, diced
1 / 2 red onion, diced
400g paneer cut into 1 / 2 inch cubes
1 tbsp ginger-garlic paste
2 tbsp tomato chilli sauce
1 tbsp yogurt
1 tbsp sour cream
4 green onions
1 red pepper, chopped
1 yellow pepper, chopped
1 orange pepper, chopped
1 green pepper, chopped
2 green chili peppers
1 pinch of salt
4 pieces naan bread
1. Sauté the diced red onion in a well greased pan at medium heat. When brown, add the diced tomato and green onions.
2. In a bowl, mix the paneer, salt, ginger-garlic paste, and tomato chilli sauce.
3. Add the yogurt, sour cream, and all the peppers to the pan and lower the heat.
4. Finally add the paneer mixture to the pan and let it simmer, tossing occasionally. After about 5-8 minutes it is ready.
4. Serve with naan bread or rice.
If you’ve tried out this recipe, send a photo to our Twitter @TheConcordian, or post a photo to our Facebook page!
So, you have been studying for hours and you keep getting the same question wrong. You have a group project due tomorrow and your teammates refuse to do their share. You are hungover and you have no idea who or what gave you that huge bruise. You have texted your crush for the umpteenth time and still have no response. You are still not done midterms and finals are only a couple weeks away! Experiencing the mid-November blues? Well then it’s time to find inner peace.
Spinach ricotta ravioli. Photo by writer
Traditionally, one would take a yoga class, but speaking from experience, I find making spinach ricotta ravioli from scratch a lot more therapeutic than tangling my body in upside down positions. This dish is very time consuming but will keep your hands busy with dainty details and your mind preoccupied with luscious longing. It’s my way of relaxing and keeping calm.
Spinach Ricotta Ravioli (Serves four)
Ingredients:
2 cups flour
1 tsp olive oil
2 eggs beaten
1 1 / 2 tbsp water
300 g ricotta
2 cups baby spinach
1 / 4 cup parsley
1 pinch cayenne pepper (or to taste)
1 / 2 jar of pasta sauce
1. Mix the olive oil, eggs, and water in a bowl. Keep two teaspoons of the mixture aside to use later as an egg wash to seal the ravioli.
2. Soak the baby spinach in lukewarm water for about 5 min. Pat dry and cut into slices.
3. For the stuffing, combine the ricotta, spinach, parsley, cayenne pepper and a teaspoon of the oil, egg and water mix. Add salt and pepper according to taste.
4. For the pasta, add small amounts of the oil, egg, and water mix to the flour and keep kneading the dough until it is smooth.
5. Using a rolling pin and square cookie cutters, shape the dough into very thin squares.
6. Take one dough square and place a teaspoon of the stuffing into the centre and sandwich the top with another dough square. Seal the ravioli by using the oil, egg, water mixture set aside from before. Smear it onto the edges of the square and press together.
7. Once you have made all of your raviolis, place them into salted boiling water. They will float to the top when ready.
8. When serving you can use any type of pasta sauce, including meat sauce, tomato sauce, alfredo or a rose. Garnish with parmesan cheese.
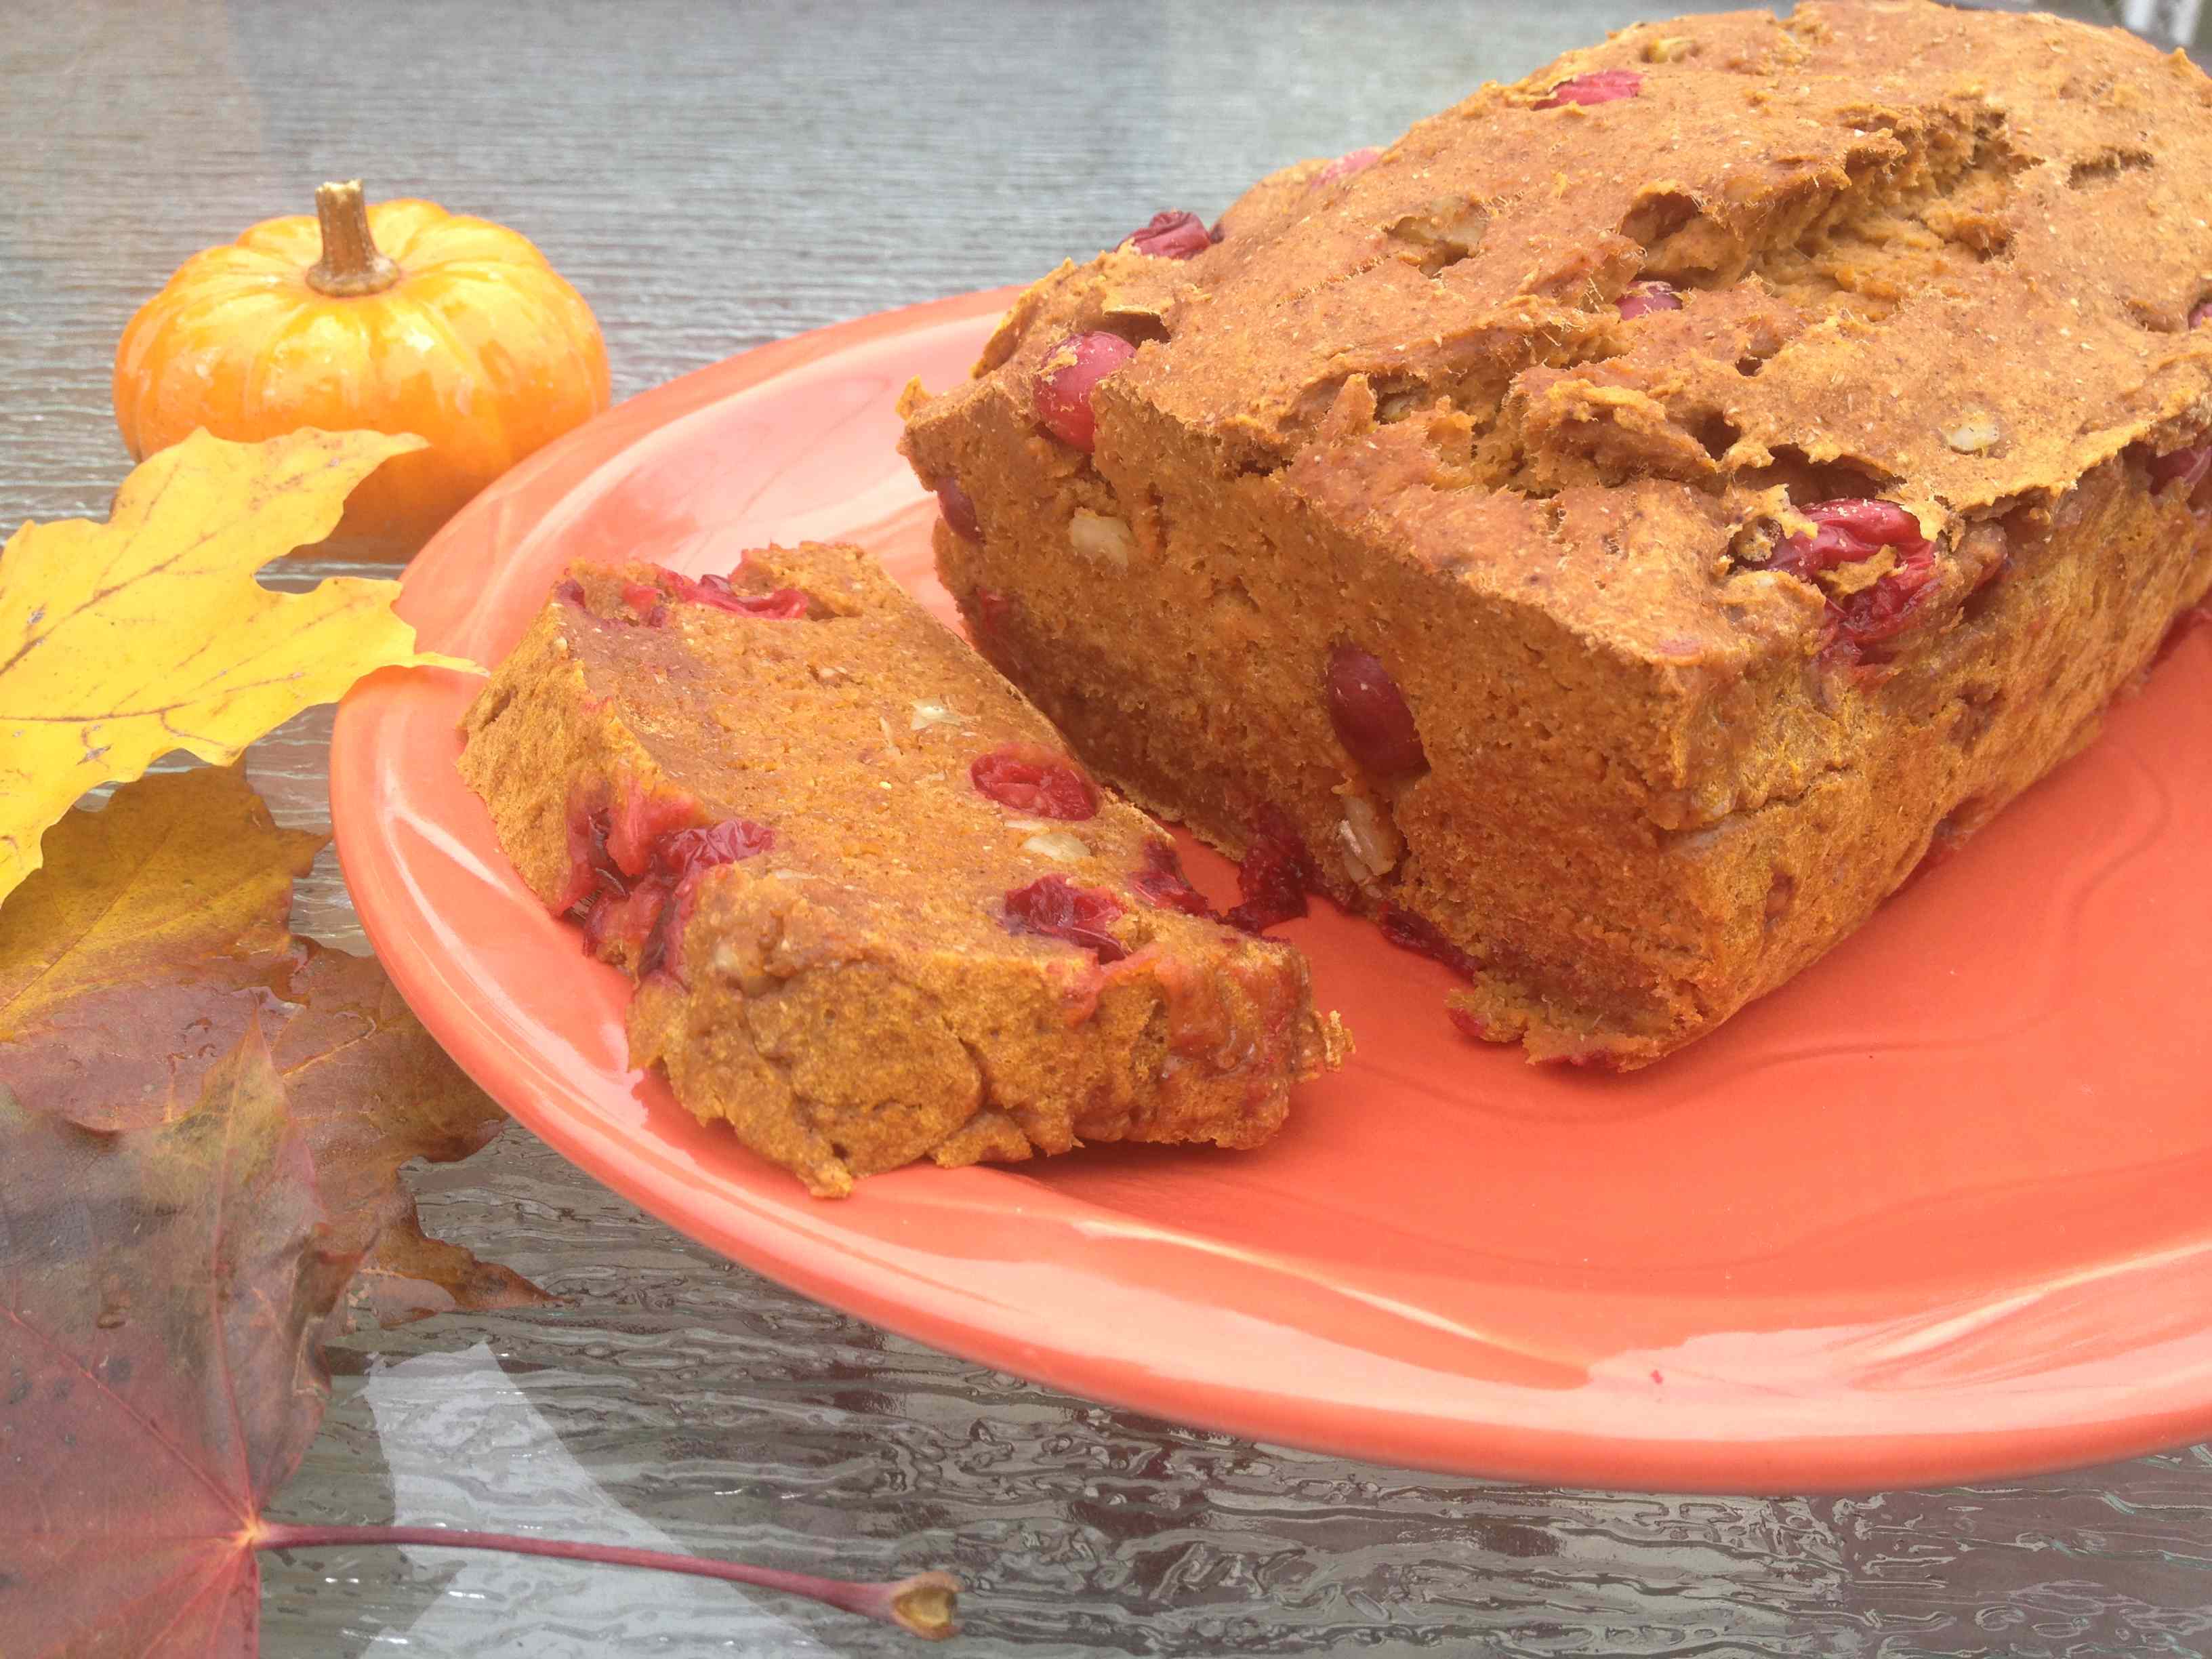
Even with Halloween festivities behind us and the falling of the leaves, it seems like everyone is still on the pumpkin-lovin’ train. I’m sure you’ve already had your fair share of pumpkin lattes, studied with the help of a pumpkin candle, scrounged the stores for pumpkin tea, perhaps capped off your Thanksgiving dinner with too many slices of pumpkin pie.
Photo by Chsea Singer
Not only does pumpkin smell and taste great- but it’s great for you. Besides being low in calories and fat, it also has anti-aging benefits due to the high carotenoid content, responsible for that intense orange color also found in carrots and sweet potatoes, which is great for your skin and eyesight.
This super squash’s high vitamin C value may also be just what you need to ward off any unwanted viruses with the start of flu season.
Finally, the high fiber content from the pumpkin and the whole wheat flour promises to keep you full during those early morning classes. Just make sure to buy canned pumpkin purée rather than the pumpkin pie filling! The huge can will yield lots of leftovers. Great for breakfast, or maybe just as a snack paired with your pumpkin beverage of choice, this bread will surely do the trick.
Ingredients
3 egg whites
1 3 / 4 cups canned pumpkin purée
1 cup sugar (or sweetener of choice)
1 tbsp. maple syrup
2 cups whole wheat flour
1 tsp. baking soda
1 tbsp. ground cinnamon
1 / 4 tsp. ground cloves
1 / 4 tsp. ground ginger
1 cup fresh or dried cranberries
1 / 2 walnuts, chopped
(Optional-chocolate chips, raisins, pumpkin seeds, other nuts)
Instructions
1. Preheat oven to 325°F. Line a loaf pan with aluminium foil and spray with cooking spray (for easy removal) or just spray pan directly.
2. Add the wet ingredients and mix well. In a separate bowl, mix all the dry ingredients. Add the wet to the dry, mixing until fully incorporated.
3. Pour the mixture into your loaf pan, spreading it out evenly to reach all sides and smoothing it out at the top. Bake for 55 minutes, or until a toothpick comes out clean.
It’s that time of year again. As we get closer and closer to Halloween, people are decorating their homes, picking out costumes, stocking up on tons of candy and, of course, carving pumpkins.
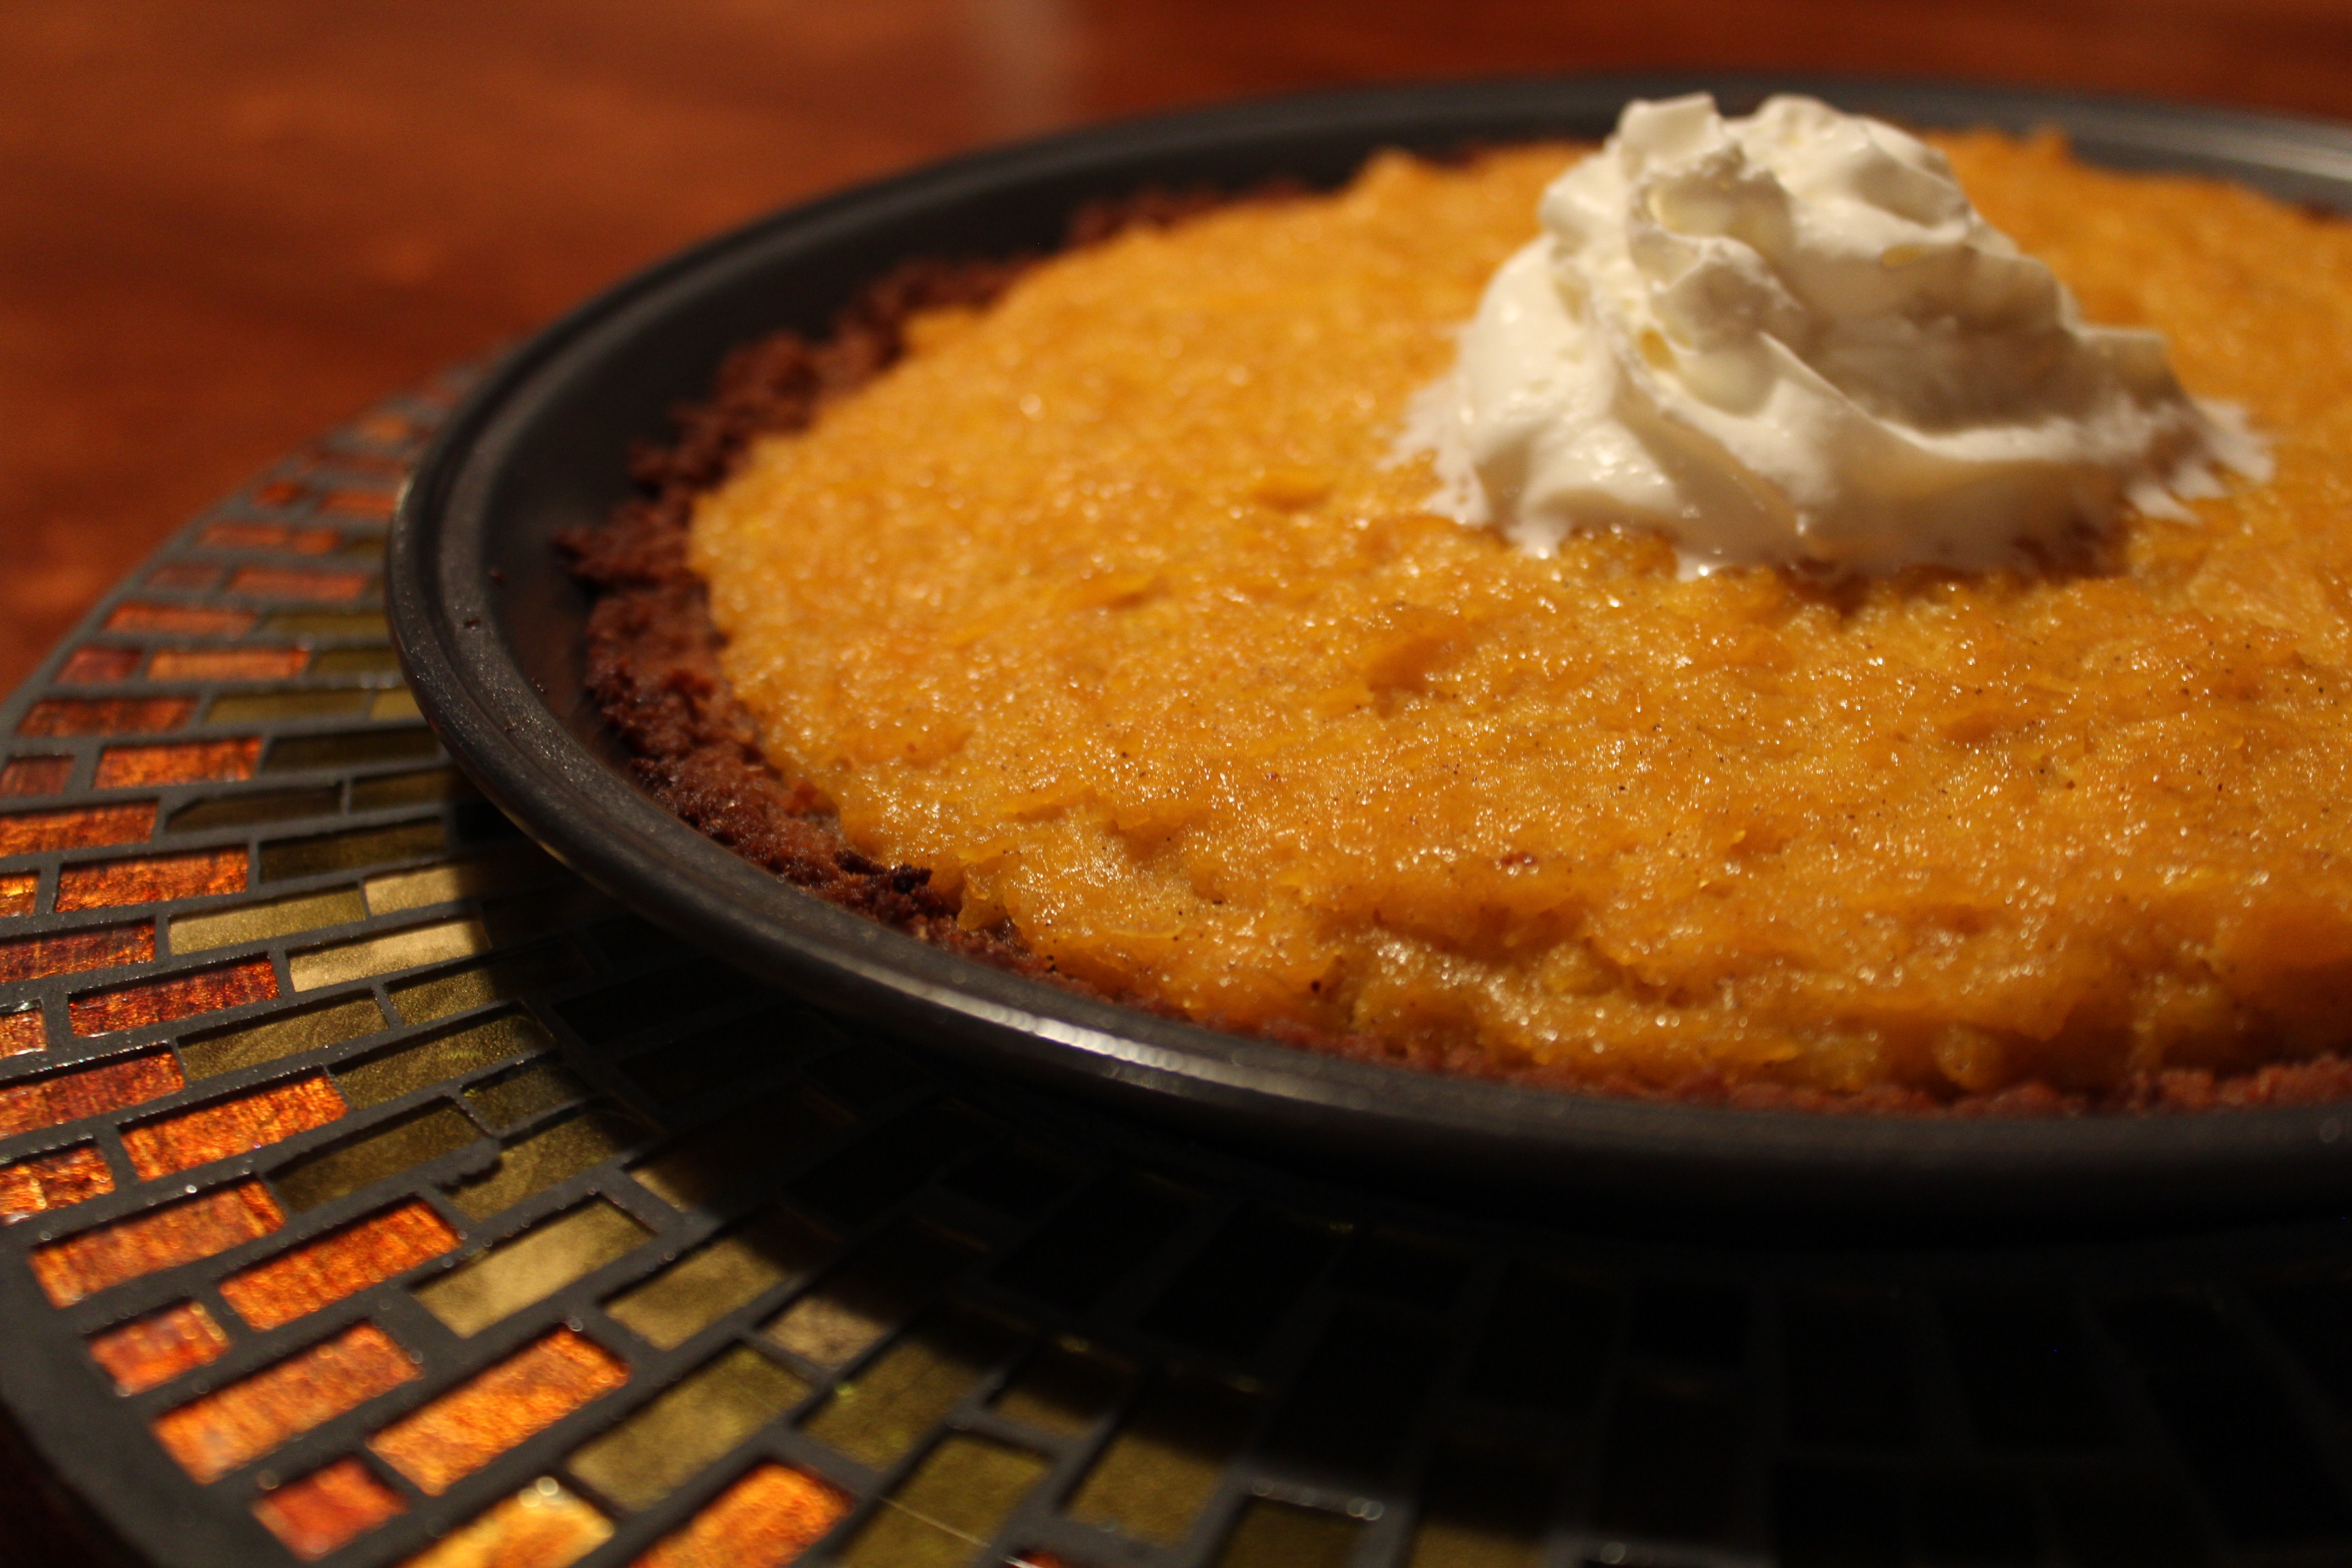
So, what better way to get into the Halloween mood than by making a pie with the holiday’s official vegetable? Here is a simple recipe for pumpkin pie, made from scratch.
Instead of simply buying my pumpkin at the nearest market, I decided to go to Quinn Farm, located on l’Ile Perrot. They had a huge selection of pumpkins; from small ones, to flat ones, some with a wart-like texture. If you are making a pie, the best kind is a sugar pumpkin, but a regular one will do the trick too (that’s what I used).
At Quinn Farm, pumpkins cost $0.40 per pound for pumpkins and $1.00 per pound for squash. You must also pay an admission fee, which is $2 a person between October 15th and 31st. It’s a really fun way to spend the day, especially with your family.
Pumpkin pie is a great way to eat dessert without feeling guilty. You are just getting your portion of veggies! According to the HuffingtonPost, the bright orange color is a sign that the vegetable is full of beta-carotene, an antioxidant which helps the body retain vitamin A. Current research shows that a diet containing high amounts of beta-carotene can help reduce someone’s chance of having certain types of cancer, and also helps protect from heart disease. So don’t be shy, help yourself to another serving!
Here are the steps to making the pie. This recipe was inspired by Mark Bittman, the author of “How to Cook Everything: The Basics.”
Pie crust ingredients
One packet of Graham crackers, crushed
3/4 cup of melted butter
Filling ingredients
2 eggs
1/4 cup sugar
1/4 cup brown sugar
1 teaspoon ground cinnamon
1/4 teaspoon ground ginger
1/8 teaspoon freshly grated nutmeg
1 1/2 cups fresh pumpkin purée (made from a fresh pumpkin, not the can!)
3/4 cup of cooking cream
Whipped cream (for topping)
Baking the pumpkin will take about an hour, so make sure to start with that. Cut off the top of the pumpkin and empty out the seeds (but keep them for later!) Once the pumpkin is empty, cut it in quarters. Place them with the flesh side up on baking sheets. Cook the pumpkin in the oven at 350°F for about an hour, or until the pumpkin is soft. Once the pieces are cooked, take of the skin and make the purée with your food processor, or with a potato masher.
While the pumpkin is cooking, you can start making the crust. Crush the Graham cookies until they make a powder; a few chunks here and there is fine. Slowly add the butter and mix with a food processor or electric mixer. The dough should be moist, add more butter if needed. Remember that it has to stick to the plate. Then, flatten out the dough on your pie plate with your hands or a fork. Make sure that there is a lot of dough on the sides of the pie plate, because it will shrink the first time you put it in the oven.
Put the dough in the oven at 350°F for about 5-10 minutes, then let it out to cool.
Now for the filling. Beat the eggs, then add all the dry ingredients. Add the pumpkin purée, then the cream. Once the mixture is homogenous, pour it into the crust. Cook for 30-40 minutes at 350°F, until the filling is a jello-like consistency. It is best to refrigerate the pie overnight, but you can eat it once it has cooled. Throw some whipped cream on there and you will be in for a treat!
Overall, it took me about two hours to make the pie, from cutting up the pumpkin to taking my first bite. It is totally worth it; the pie was incredibly tasty, and nutritious too!
In the past year England has definitely been in the spotlight with the Royal Wedding, the Queen’s Diamond Jubilee, and the Summer Olympics. Although I have yet to visit any part of the United Kingdom, the many Fish and Chips restaurants in Montreal have confirmed my palate is ready for the trip. So whether you are a fan of Kate Middleton’s flawless fashion, Prince Harry’s questionable billiards apparel (or lack thereof), or just simply in awe of England’s Royal Family, you must try this recipe for Beer Battered Fish and Onion Rings! I warn you this meal is heavy and not for the health conscious, but everyone deserves a day to cheat a little.
Fish and Chips (Serves four)
Ingredients:
1 1 / 2 cups flour
1 tsp salt
1 / 4 tsp cayenne pepper (according to taste)
1 bottle beer (any brand)
1 small red onion cut into 1 / 2 in thick slices (separate into rings)
1 lb haddock fillets cut into serving-size pieces
2 lemons diced into wedges
Tartar sauce
Vegetable oil for frying
Add enough oil to a pot (approximately 2 inches of depth) and preheat to 350°F.
In a bowl, mix flour, salt, and cayenne pepper. Add beer slowly into the bowl and whisk. When the mixture is smooth, let it stand for fifteen minutes.
Using a fork, dip the onion rings into the batter and drop them in the oil pot gently. Take about 5 rings at a time and let them cook for about one minute. Make sure to turn them halfway. Once they are golden brown transfer them to a paper towel-lined plate.
Sprinkle flour over the fish pieces and then dip them into the batter. Once they are transferred to the oil pot, let them fry for about seven minutes. Flip them once in between and when golden brown, place them on the paper towel-lined plate. Drain the oil from the fish as well as the onion rings and then serve with lemon wedges and tartar sauce.
School’s started, temperatures are dropping, and any day now those bright green leaves will transform into reds, yellows, and oranges. Seems to be that time of the year again!
Seeing summer escape our grasps may be a hard thing to swallow for some, but for others, the autumn air is much anticipated. Fall brings with it not only the start of a new school year, but perhaps also the longing for some cozy nostalgic outings. With the turn of the season, many of us seem unable to resist the urge to round up a group of friends for some good old apple-picking — there may be no better way to ring in and embrace fall!
Getting back into the routine of assignments and projects takes some readjustment, and we need every reason to look forward to our weekends! So if you plan on grabbing your scarves and jackets and hopping on a tractor for some apple picking, here’s a delicious way to use up the fruits of your labour.
Paired with some chewy cranberries and fragrant toasted walnuts, these classic apples are used in a new way, providing all the comfort you may need for the school week ahead!
Who can resist crepes anyways? These little indulgences lend themselves to any flavour combination. Deliciously plain and simple or jazzed up with a little maple syrup and all the possible sweet and savory filling options available out there (Rolopan anyone?), crepes are in a category on their own.
So what happens when you replace the nutrient void typical white flour with whole-wheat and cut out unnecessary fats and sugars? Would you believe me if I said you get crepes that may give any restaurant a run for their money?
Between the apples and the whole-wheat flour, you’ll be getting a great kick of fibre to start your day off and keep your tummy happy. Apples have also been suggested to aid in the prevention of cancers due to its high antioxidant content. The combo of cranberries and apples is an excellent natural detoxifier, aiding in cleansing your liver, perhaps from too many Thursdays at Reggie’s. So here’s to another reason to look forward to the weekend; high fiber, sugar free, but most importantly, delicious crepes!
INGREDIENTS
1 medium apple, peeled and sliced
1/8 cup walnuts, chopped
1/8 cup dried cranberries
1/3 cup apple juice
1 tbsp. maple syrup (reduced sugar is ideal!)
2 tbsp. cinnamon
1/4 cup whole-wheat flour
1/4 cup milk
1 egg
Cooking spray
INSTRUCTIONS
1. In a frying pan, simmer apples, apple juice, maple syrup and 1 1/2 tablespoons cinnamon. Once apple juice begins to bubble and evaporate, add the walnuts and cranberries. Keep under heat until all the liquid is absorbed.
2. Mix together flour, milk and egg in a bowl. Heat frying pan to medium heat and coat with cooking spray. Once the pan is heated, add the batter. Grab the handle of the frying pan and make a circular motion with your hand, allowing the batter to evenly coat the pan.
3. Once bubbles start to appear, gently peel the sides of the crepe with a spatula, and flip crepe over, cooking for another minute. Serve crepe on a plate, add filling, fold crepe over and sprinkle with remaining cinnamon. Bon appétit!
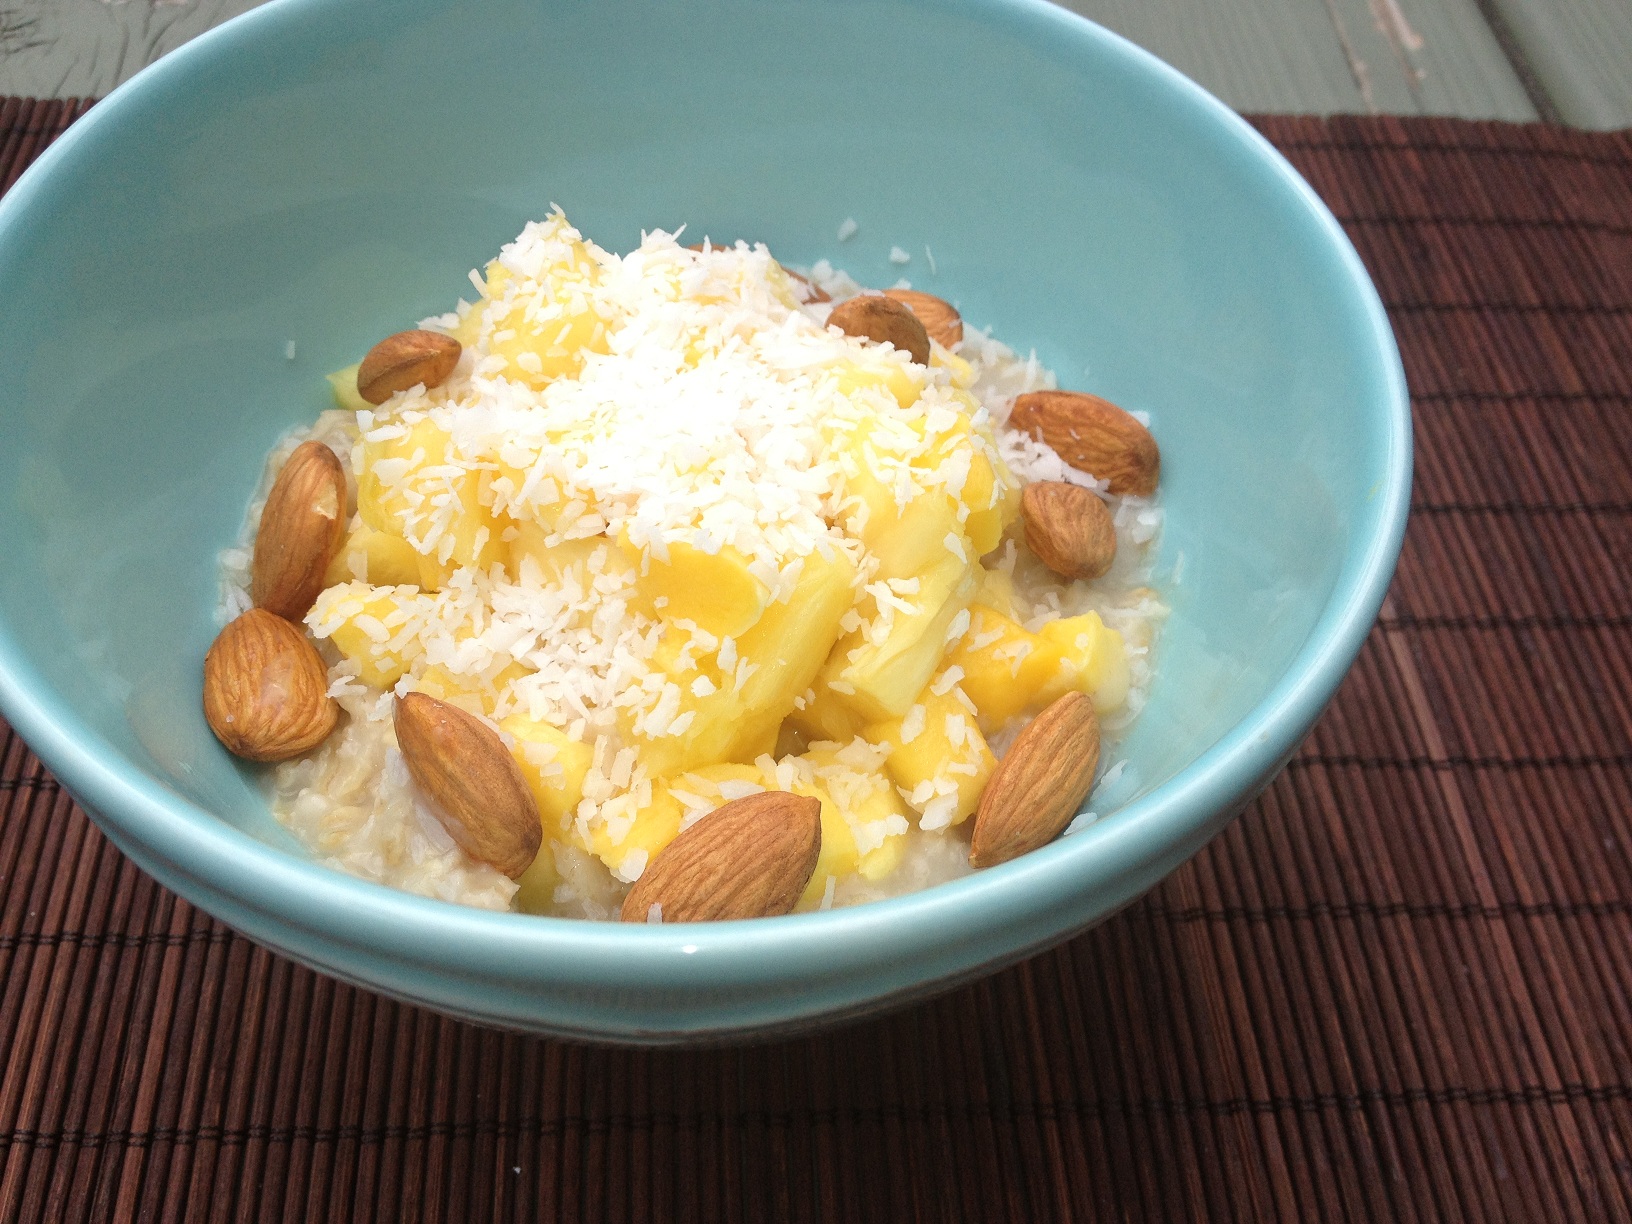
Aloha Oatmeal (Serves 1) INGREDIENTS • 1/3 cup old-fashioned oats • ¾ cup coconut water (sold in individual cans or cartons) • ¼ cup chopped mango, fresh or frozen (if using frozen, thaw first) • ¼ cup chopped pineapple, fresh or canned (if canned, drain & rinse) • 1 tbsp. shredded unsweetened coconut (sold in baking section) • 12 whole almonds INSTRUCTIONS 1) Heat oats and coconut water in a small saucepan on high heat. Once water is boiled, reduce heat to simmer and cook for approximately 10 minutes, or until oats have reached desired consistency 2) Serve oats in bowl, and top with the chopped mango and pineapple. 3) Sprinkle shredded coconut over top along with the almonds. Close your eyes and imagine you are on the beach. Bon voyage!
With less than a month before we Concordians return to our routines of daily rush-hour transit, long nights in the library, and hours upon hours of readings and lectures, many of us find ourselves aching for a tropical getaway to ease the approach of the school year to come.
It’s too bad that our student budgets usually fail to account for our wants! The nearing of September finds us scrounging our pennies to prepare for the financial blow of textbooks and tuition, forcing many of us to accept that we simply cannot afford that last-minute retreat.
However, all hope is not lost- I bring you a simple, delicious way to bring the tropics to you! How? With a satisfying bowl of oatmeal of course! Now for many, the very idea of oatmeal may seem boring, flavorless, and just overall un-appealing. This bowl of oats on the other-hand is loaded with delicious tropical flavors, and packed with fantastic health benefits to start your mornings off on the right foot. One thing I can promise you-this ain’t your grandmother’s bowl of oatmeal!
The key to a killer bowl of oatmeal is not only about the add-ins, but also about the actual type of oats you choose. The packaged and pre-flavored quick oatmeal may seem easy and inexpensive, however is packed with unnecessary sugars and artificial ingredients, and due to the reduced cooking time is lacking in texture and volume. Buying “oats” rather than “oatmeal” is a smarter step, health and budget wise. Bulk food stores offer a variety of minimally processed oats, priced by the pound-and you’ll be surprised at the value you’ll receive!
Steel cut oats are the ideal choice, being the least processed out of the pack, however take around 30 minutes to cook. Another great choice is old-fashioned large flake oats, which take half the time and provide an excellent source of fiber and vitamins.
Cooking these oats in coconut water will add a kick of flavor, along with a boost of energy to fuel the day ahead. Coconut water can be called “nature’s energy drink”, boasting as much potassium and electrolytes as many artificial sports beverages.
So before you write off oatmeal, give this recipe a try! Hawaii can wait, but your health shouldn’t!